Using SavvyPOS
We will start with stock card settings so that you can fill missing information.
Please Click "stock card" on the main menu
Stock Card
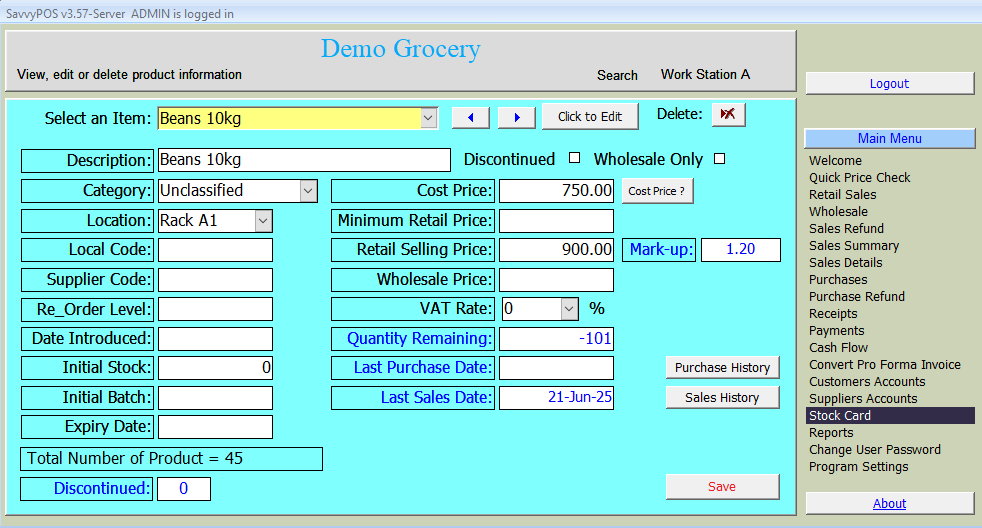
Adding or Editing product data
First select the item you wish to edit. Then click "Click to Edit" button as shown below. Then do the editing.

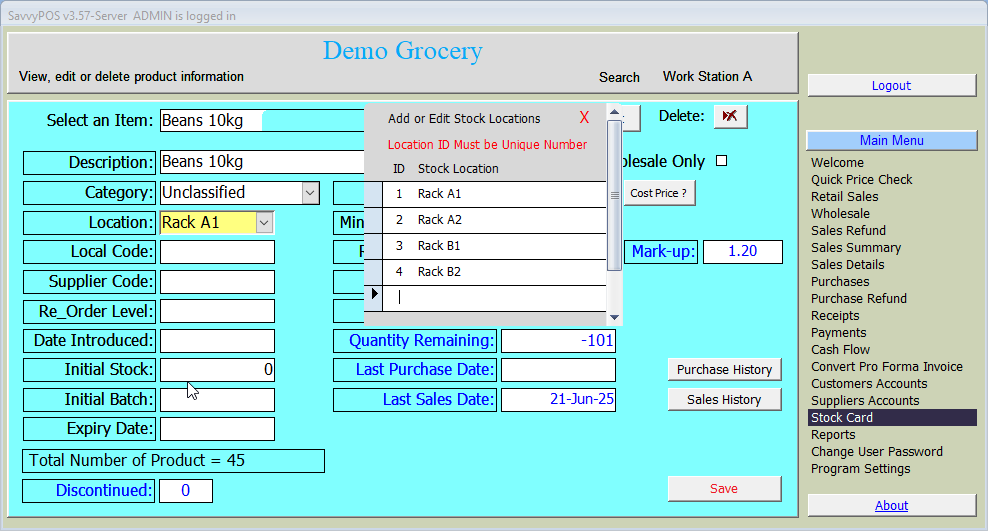
Adding Category, Location and VAT Rate items
You can add Category, Location and VAT Rate items by double clicking on those boxes. Then you can add or edit the list names as required.
Suppliers Account
Click "Suppliers Account" on the main menu. Here is where you can view invoices from your suppliers and also view your payments and the oustanding balance if any.
On this page you can also add, edit and even delete supplier names from your list. The "Add New" button alows you to add new supplier name. If you want to Edit supplier details, simply select the name and edit. And if you want to delete, simply select the name and click "Delete" button.
Point to note here is that deleting supplier name will not work if there is any transaction on that name.
Customer Accounts
Click "Customers Accounts" on the main menu. Here is where you can view your invoices sent to your customers and also view the payments received from them. Likewise you can track outstanding balance in realtime.
On the same page you can add, edit and even delete customer names from your list.
Deleting of customer names will not be possible if there is any transaction done by the customer
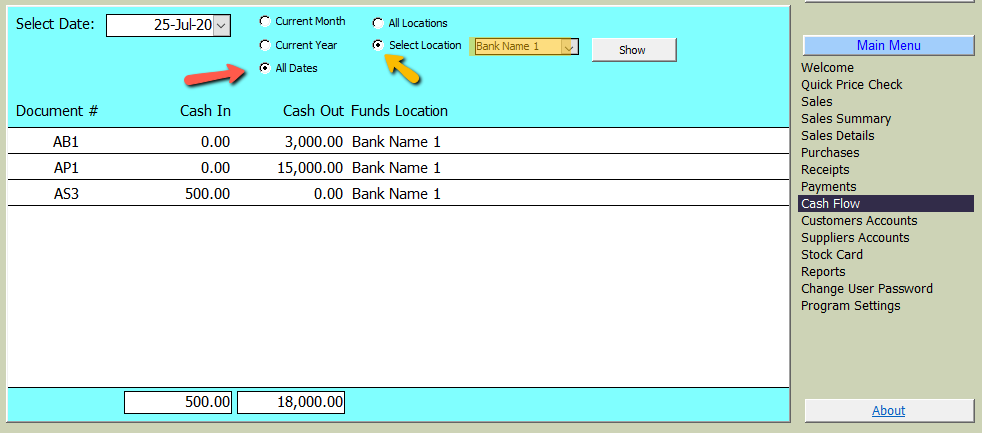
Cash Flow
On the main menu, click "Cash Flow" to view business cash flow on daily basis. You can also filter by period and funds locations as shown below.
Payments
Click "Payments" on the main menu to record any form of payments. The receipts names are those names you created in the basic settings. After saving the record, you may print the payment voucher if desired.
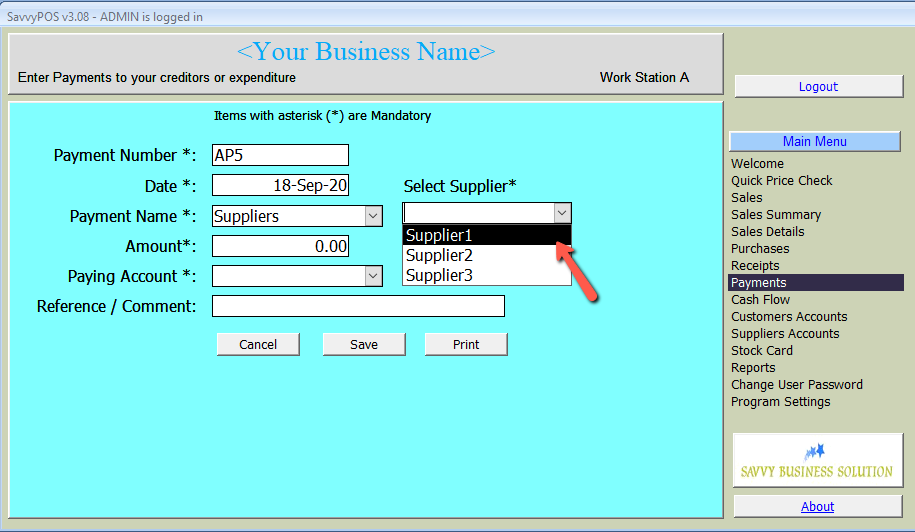
Payments to Creditors
When making payments to your Creditors (Suppliers), another dropdown menu will appear to select from the list as shown below.
Receipts
Click "Receipts" on the main menu to record any form of receipts. The payment names are those names you created in the basic settings. After saving the record, you may print the receipt voucher if desired.
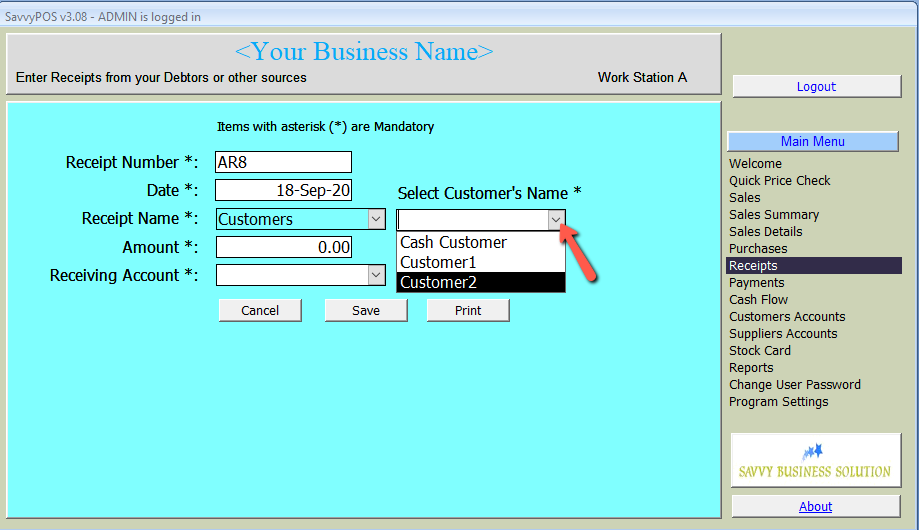
Receipts from Debtors
When recording receipts from your debtors (Customers), another dropdown menu will appear to select from the list as shown below.
Purchases
Purchases page is where you record all purchases for the business (i.e. goods for sale). Start by selecting payment mode. The choice is "Cash", "Cheque" and "Bill". Then select supplier you are buying from and enter purchase date.
In our example we selected "Cash" as payment mode. Had we selected "Cheque" an input box would appear to enter cheque number you issued. If we had selected "Bill", an input box to enter supplier invoice number.
Then enter your purchases by selecting from the list. If the item is not on the list (i.e. new) you can click "Add New Product" button to add.
Enter quantities purchased followed by the price as shown below. Totals and VAT amount (if applicable) will be automatically calculated. Please note also items that are vat-able will have "v" at end of a the row.
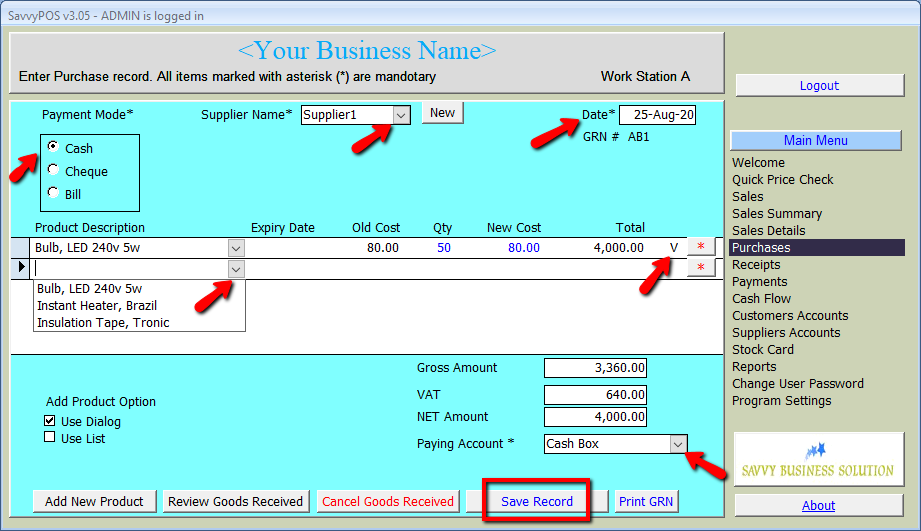
Finally select the paying account and click "Save Record" button.
Before saving you can review your purchase list. Just click "Review Goods Received" button to view the report.
Once the record is saved, you can print "Goods Receive Note" that is traditionally attached to the received invoice.
Sales Details
Sales details will give you instant summary of what was sold on a selected date. As shown below, The sales details will also show the price sold, the time sold and by who.

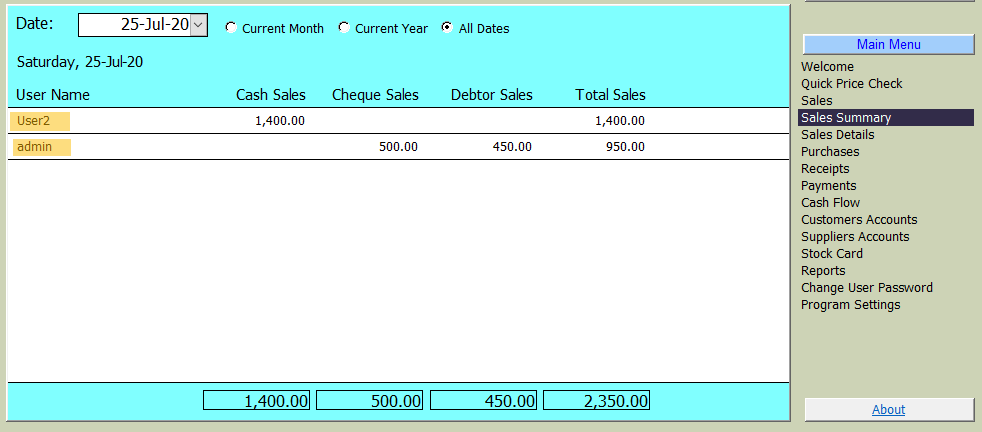
Sales Summary
Sales Summary is what has been sold for the selected day. As shown below, it breaks down into three sales methods (i.e. Cash, Cheque and Bill). Each row will represent the sales person logged in and did the posting.
Sales - Variable Price Mode
On Sales page, this is where products going out (sold) is recorded. SavvyPOS provides and document three sales method, i.e. Cash, Cheque and Bill. After selecting sales method, you must select Customer's name. By default we have included "Cash Customer" to represent generic cash paying customer. If your business has a limited number of customers, you may rename "Cash Customer" to a specific name.
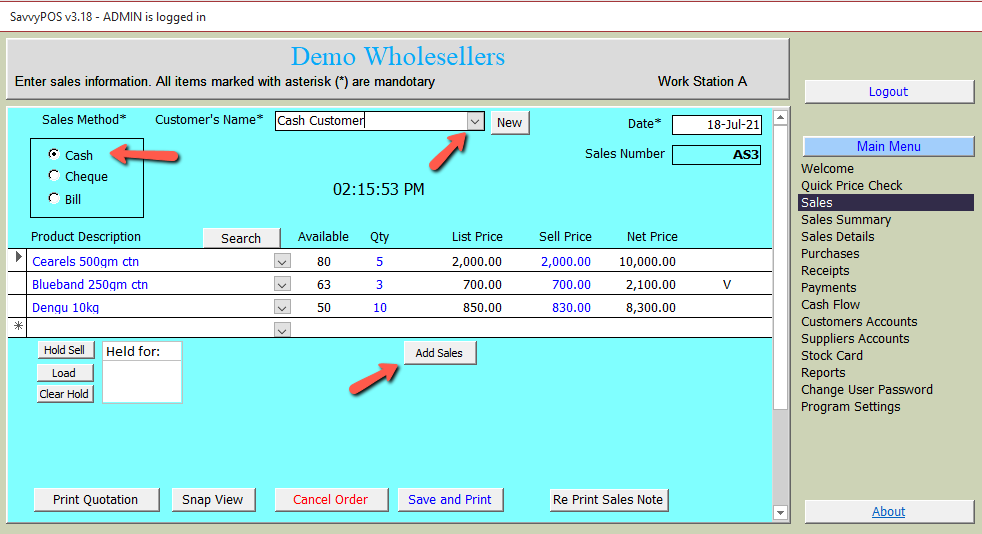
"List Price" is the recomended selling price while the "Sell Price" is the price you are offering to the customer. If you enter the price below your cost price, the program will not accept. This feature is meabt to protect you from selling below your cost. But if that is intentional, then you need to adjust your cost price accordingly.
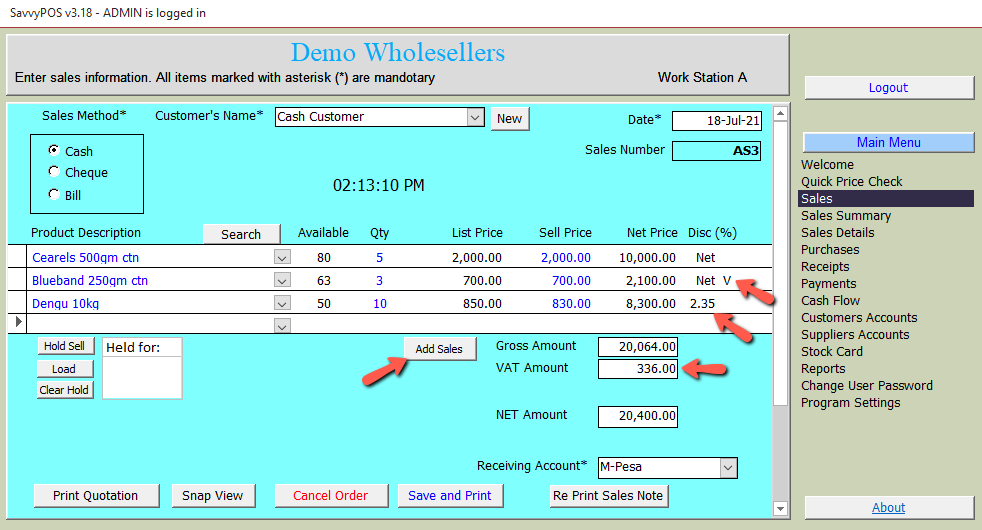
The percent discount you offered is based on the list price and will be shown under (Disc (%)) column. The letter "V" at the end indicates the item price icludes the Value Added Tax (VAT) where applicable.
Once you have added all items (to be sold), click "Add Sales" button shown above to finalize your sales. The totals will be calculated as shown below.
The "Search" button can be used to search and select the items to be included in the sales order. Click to open another form as shown below.
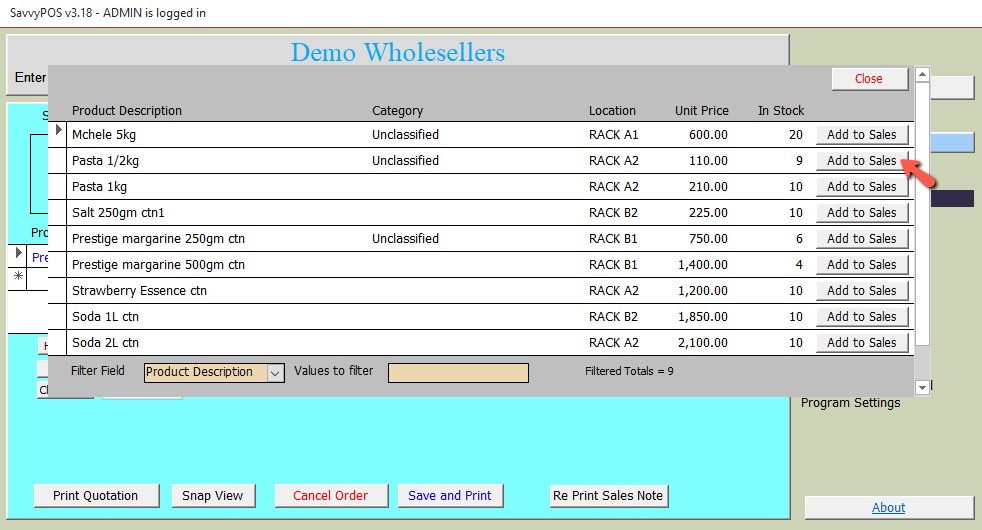
Simply click the "Add to Sales" button against the item you wish to sell. Then close the search window and refresh the sales page by clicking "Sales" on the main menu. All selected items will appear on your sales order.
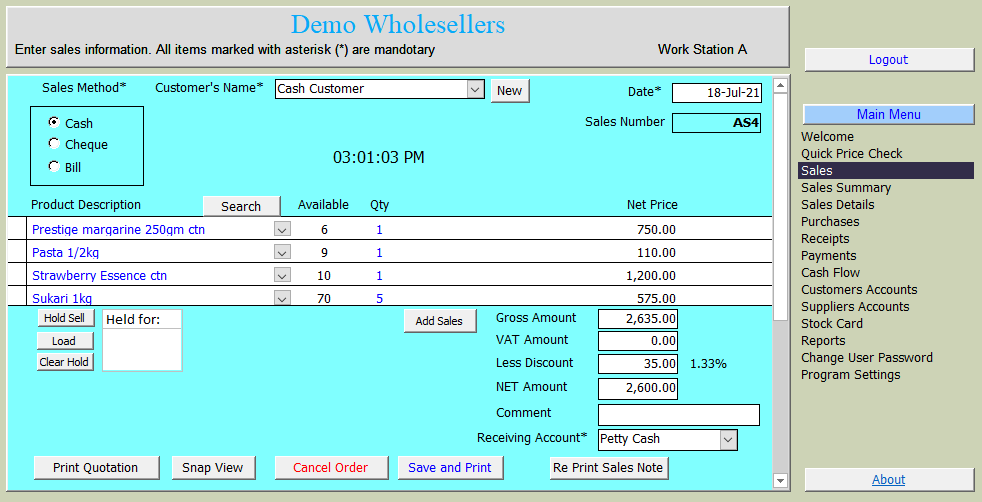
Sales - Fixed Price Mode
For business that have a fixed selling price, they can set on the the "Basic Settings" page so that users would not be able to vary the selling price. On the same page you can set if a discount on the total sales can be given by any user.
If the "Fixed Price" mode is set, the sales page will appear as shown below.
Cash Sales
Cash Sales can apply to any member in your customer list. As long as the goods were paid in cash. After entering the list of items purchased, you must select the receiving account. For cash paid items, the obvious selection will be a cash box. In the event you have more than one cash box, you need to include it in the basic settings.
Hold Sales
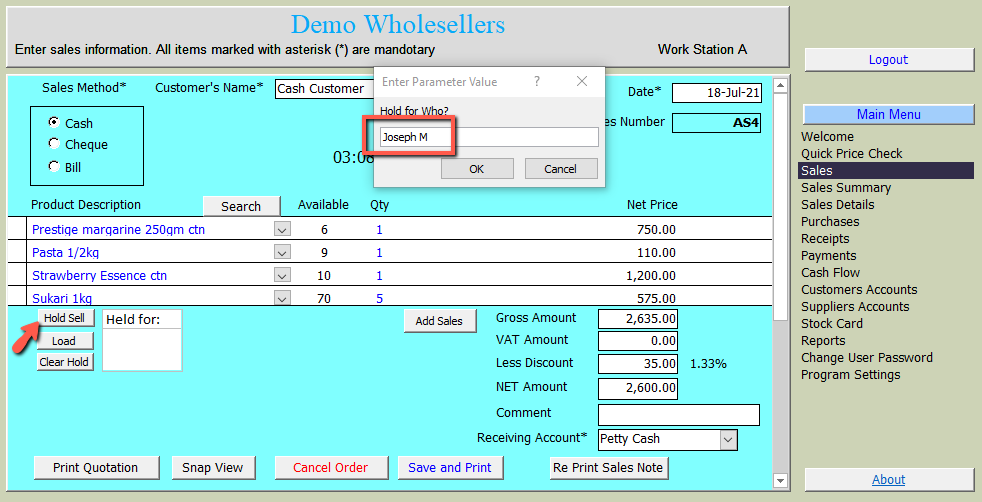
While making a sales, sometimes a customer may not have the exact cash to pay and requested to hold the goods while trying to get the remaining balance. Rather than cancel the entire list (which you can do), you can simply hold the sale until the customer come back. To hold the sell, simply click the "Hold Sell" button. You will get a prompt asking you: "Hold for Who?". Enter the name of the customer and click OK as shown below.
After clicking OK the list will disapear and the name of the customer will appear next to the "Hold Sell" button as shown below.
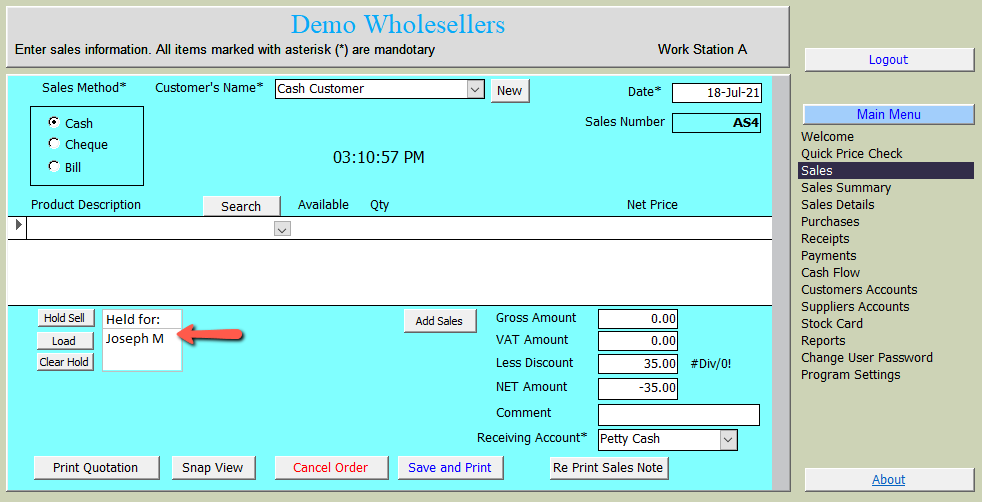
When the customer who requested to hold the goods return, simply select the name and click "Load" button. If the customer fails to return, you can cancel the order by clicking "Clear Hold" button.
Please note also that if you have "Lipa Na Mpesa" account, you can add the same in the "Receiving Account" but it wll still be treated as cash sales.
Cheque Sales
When you select "Cheque" in the sales method, a box will open to enter cheque number. And in the receiving account, you may select any of your banks you intend to deposit that cheque.
Billing
When you select "Bill" in the sales method, a box will open to enter customers LPO. And in the receiving account, you will select "Invoice".
Quotations
If a prospective or existing customers wants a quotation, you can prepare the list the same way you prepare for the sale, but instead of saving, you can click "Print Quotation" button. The quotation will be ready for printing as shown below.
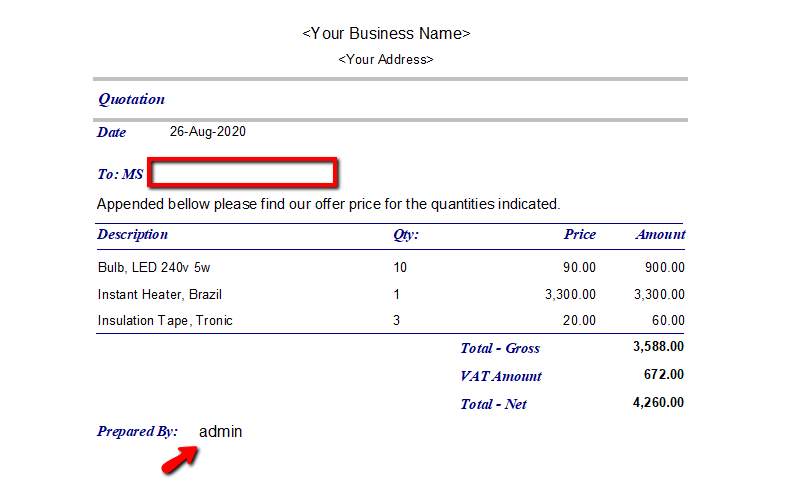
Simply fill (by hand) the name of the customer requesting the quotation (Red rectangle0 above. The person who prepared the quotation will appear below (indicated by red arrow). The name will be of the person who logged into the software.
Quick Price Check
The "Quick Price Check" page is a convinient place to check prices of any item in your inventory. For the page to work, you must indicate (in the stock card) the location and category of the product.
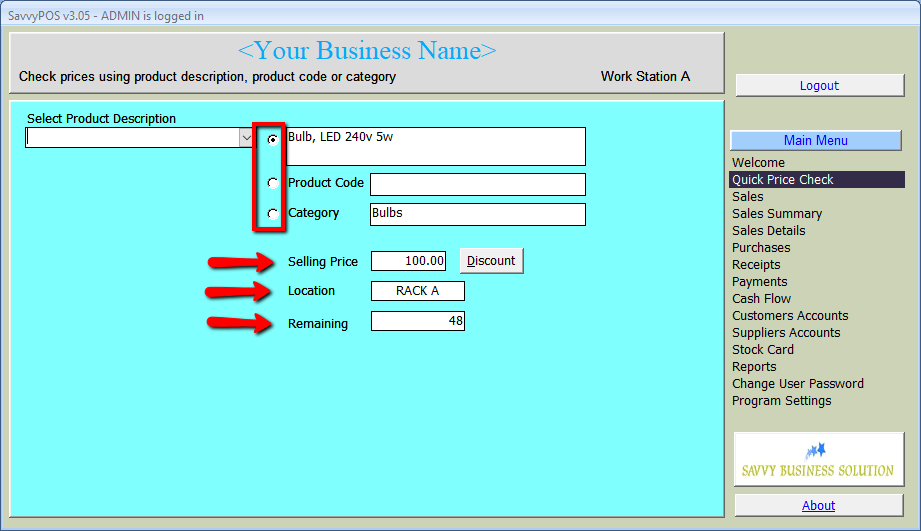
When checking for price of any item, you can check by product description (top option in the red rectangle) or you can search by product code (if you assign them to your items) or by category which you must set in the stock card.
Advantage of assigning category and location to your inventory will be realised when you have a new sales persons in your premises. They will not need to ask anyone where the item in question is located, hence making them more efficient from the beginning.
Next to the selling price there is a discount button. When you click the button it will give you the different prices based on the discount. The list is from 5% to 25%. If the discount is not possible, there will be XXX next to the discount.
Change User Password
All users other than "Admin" user can open this page and click the words "Click here to change your password". Another window will pop up. Enter your new password twice and then click "Change" button. You will get a confirmation if successful.
Database Maintenance
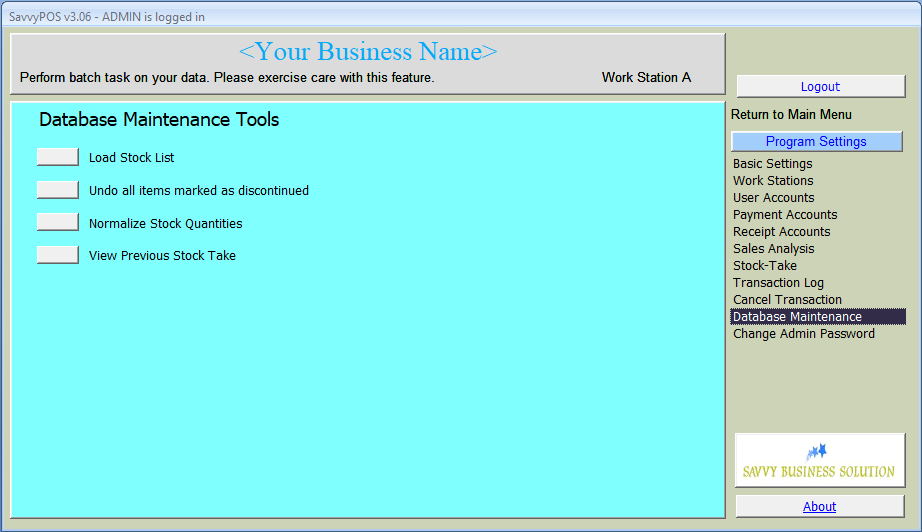
Undo all items mark as discontinued
Sometimes a product may run out of supply for a long time and you don't wish it appears in the re-order list. To make it disappear without deleting it, you can mark it in the stock card as "discontinued".
If the list is big and you want to un mark all at the same time, you will simply Click the button next to "undo all items marked as discontinued.
Normalize Stock Quantities
After counting your stock during periodic stock-take, you can update your stock card to reflect the counted stock numbers. Clicking the button next to "Normalize Stock Quantities" will adjust the numbers for you.
Past Stock-take List
When you click the button next to "View Previous Stock Take", you can view and compare previous stock count record.
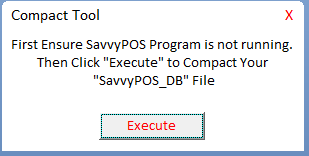
Compact Database
Database files can sometimes grow bigger than expected. This is caused by irregular computer shut down, either deliberate or as a result of power cut off. The program will then become slow and less responsive to click commands.
To solve that problem, you need to compact the data file.
We have provided a simple tool to compact your datafile. Please follow these 4 simple steps:-
- Close the server and all clients program.
- Open the Installation folder, i.e "C:\SavvyPOS v3.0"
- Click (or double click) the file "Data File Compact Tool" once. The tool will as shown below
- Click "Execute" button to start compacting